10 March 2010: As outlined in the
vacuum hose replacement section, early automobiles made extensive use of manifold vacuum as a source of power due to power limitations in the battery / generator set-up. The only problem with manifold vacuum is that it varies depending on throttle position and engine load and so manufacturers usually installed some kind of engine-driven vacuum pump to supplement the manifold vacuum. Vacuum-powered windscreen wipers were very common until the late 1950s when many car manufacturers started installing electric wipers in top-end models and offering them as an optional upgrade in others. Every 1958 Mercury model came with vacuum-powered wipers as standard, with the option of upgrading, at extra cost, to electric wipers. The man who purchased my Park Lane opted to keep the standard vacuum-powered wipers, however, when I got the car they didn't work.
I started lubricating all the linkages between the vacuum motor and the wiper blades with WD-40 but this made no difference. Then I halted work until I had replaced all the vacuum hose, since old leaky vacuum hose will rob the motor of most of its power. When this was done it made a minor improvement, with the wiper blades seeming to move tentatively, then stall. Next I detached the motor from the firewall so that it effectively had no load on it and turned it on. It would move in one direction but not the other, and would park OK, but it was very weak. Clearly there was a problem with the motor.

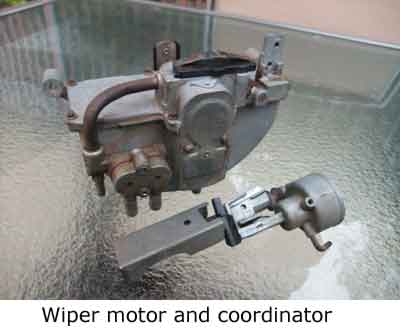
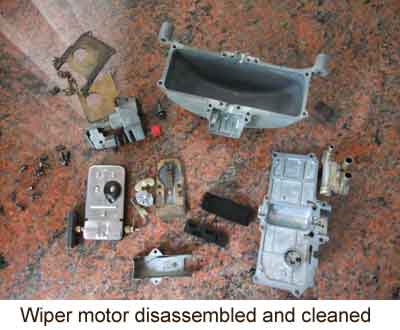
These old vacuum wiper motors were made by Trico and they must have made hundreds of models because it seems every car has a slightly different variation. There are no rebuild kits reproduced. There is a guy in the US who rebuilds them but I opted to fix mine myself and so I spent the evening disassembling mine and cleaning it up. Interestingly, on one side of the vacuum chamber all the grease was black and very thick, in contrast to the grease everywhere else which was still tan in colour. It looked like crud from the engine bay had made its way into the motor. I think that with sections of the old vacuum hose being cracked, that crud was getting into the motor that way. Anyway I spent the evening cleaning all the parts up with kerosene, taking care not to damage the old gaskets that I will have to reuse.
 13 March 2010:
 I spent the morning doing more cleaning - I managed to peel off the old gaskets without damaging them. Then I again cleaned all parts in kerosene. I used a pipe cleaner to clean out the drilled passages in the manifold - there was thick black crud in them too. When it had dried I commenced reassembly. First I covered the vacuum chamber area where the paddle makes contact as it sweeps, with a layer of grease. Then I coated the four sides of the paddle with grease, and the round area on one side of it which seals when the motor parks. I also put grease in the paddle bushing area of the vacuum chamber. Next I greased the area of the vacuum chamber cover where the paddle sweeps, the bushing area and the round section which seals when the motor parks. Then I positioned the paddle in the vacuum chamber base and removed excess grease around the bushing area.
Next I positioned the old gaskets on the vacuum chamber lid and positioned the lid on the base. Then I replaced and tightened the eight small screws holding it down.

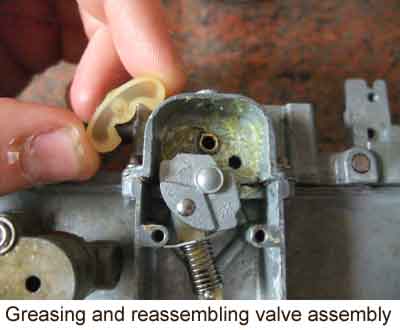
Moving now to the valve and exhaust area I greased the area where the valve rocks to send vacuum to one side or other of the paddle - it's important not to grease too much here because excess can block the small drilled passages. Next I lightly greased the bottom of the plastic valve and positioned it. Then I greased the brass pin that the actuator rocks on and the plastic eccentric and assembled that into the motor. Finally I replaced the fibre air intake filter. Then I applied a dab of grease to the tops of the valve and actuator where the cover presses them onto the motor side and replaced the cover. While this cover has a gasket it is not critical if this cover does not seal as this chamber is only used for atmospheric air intake.
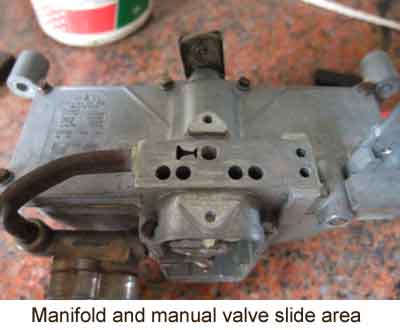
Now to the top of the motor I applied a thin film of grease to the slide area of the manifold and

to the plastic manual valve, again being very careful that excess grease does not block any passages. Then I replaced the top plastic cap, the spring and the steel cover plate and tightened it down. Note that with this vacuum motor the screws for the motor top, the side plate and the top manifold cover are all very similar but slightly different. Make sure you note which ones go where when you pull it apart. Then time to replace the vacuum washer coordinator assembly which attaches via a single screw, the same screw which clamps down the Bowden cable.
At this stage I went back to the car and attached only the three main vacuum hoses, omitting the smaller coordinator hose. I started the engine and then manually worked the manifold valve on the top of the wiper motor. It worked ! It ran confidently from side to side, with plenty of power, and parked OK when the valve was moved to the 'Off' position. Then we connected the Bowden cable and the washer coordinator hose, and reattached the motor to the cowl. Moment of truth - I wet the window to avoid scratching it, started the engine again and turned the wiper control knob. The wipers came to life swishing from side to side as they should. Next to test the washer coordinator - I pushed in the button and released - water sprayed from the jets onto the windscreen and the wipers came on for a couple of wipes and then parked, just as they are supposed to do. Repair 100% successful !


